• Home
  • Projects
  • [RSS Feed]
  • [Instagram]
Smoking on a Bike

Category Archives: Cheese

Cheesemaking in My Home

Sun 27 September 2015 11:08 AM / 8 Comments / Andrew

I’ve been making cheese for about a year, and I’m starting to feel confident in my technique and equipment. I decided to write up this post to help others who are starting out. It’s a collection of equipment that I built or bought and how I use them to make my own cheeses at home. Using this equipment, I’ve successfully made cheeses like Colby, Gouda, and Camembert, and I think I could make many more cheeses without any further investment.

When I started cheesemaking, I wanted to avoid feeling “gouged” by buying specialty equipment. I didn’t want to spend $300 on a pre-fab cheese press, or $20 on a single shaping form when I could make those at home for cheap or free, respectively. Sure, my cheeses might not be precisely the traditional diameter or height or exact shape of the cheeses made in France, but whatever, I’m eating it, not staring at it. Below is a list of equipment and techniques that work for me. Give it a read, use what you like, and decide for yourself what you don’t like.

Five week Colby

Five week Colby

Research and recipes

First I want to throw out a huge shout-out to the folks at Cheesemaking.com. They have a huge collection of educational articles about cheesemaking, right from the start through to advanced cheeses and techniques. If you want to do home cheesemaking, just go to their website and read absolutely everything you can find. You should understand what the bacteria is doing, what rennet does, what cooking the curd does, why you press cheese, how waxing works, what an aging environment should be like, the role of bacteria as the cheese ages, and more. Cheesemaking doesn’t have many hard techniques, but it requires precision, attention, and time. Do your research and you’ll be rewarded with a successful batch, every time.

Cheesemaking.com also has a huge collection of recipes written by Jim, one of their staff members. Most of the recipes, especially the more recent ones, are incredibly detailed with pictures and temperatures, times and quantities down to the last detail. While I’ve begun adapting my own techniques for cheeses I’ve made more than once, Jim’s recipes are a fantastic starting point for your first try at a cheese. Pick out a recipe and read the instructions for it ten times before you start the process. If you don’t know what you want to make, the first recipes I followed were Colby, Gouda, and Sage Derby.

Ingredients

While I’m recommending Cheesemaking.com, I also buy most of my ingredients from them. I find their website so helpful, I want to support their business by giving them my patronage. I use their liquid animal rennet, though when I run out I’ll probably try the liquid vegetable rennet and see how well that works. I’ve been warned against tablet rennet from someplace online. I also buy my bacteria cultures and molds from them. For example, I’ve bought their mesophilic culture, geotrichum, and penicillum. All have worked great, no complaints. They seem to source at least some of their cultures from Danisco/Choozit, but I want to support Cheesemaking.com and I feel more confident that I’m ordering the right thing in appropriate quantities, so I just order from them.

Cheesemaking ingredients

Cheesemaking ingredients

I also buy my wax from them. I shopped around trying to find a good source for cheese wax, but again, the best I could find that gave me confidence was Cheesemaking.com’s offerings. I opted for the red wax, because I think it looks the most striking, but my understanding is they’re all interchangeable. I ordered five pounds, and that seems to be a good quantity for occasional home cheesemaking. It fills my wax pot about halfway (more on this later), which gives plenty for dipping wheels into. I’ll probably have to order more in another year or so, so I think ten pounds would have been overkill for my setup.

One thing you’ll figure out quickly while researching is the importance of quality milk. I’m really lucky to have a farm just a couple hours south of the Twin Cities that sells high quality milk in my local grocery store. I buy their non-homogenized (“cream line”), pasteurized milk. They sell in half-gallon, glass bottles, pictured below. I usually buy four bottles and do two-gallon batches. I have bought the non-local milk in plastic bottles, and it works, but since finding this brand I haven’t tried anything else. You should go out of your way to find the highest quality milk you can. Even though the milk I buy is high quality, I still buff it up with calcium chloride.

High quality milk

High quality milk

Pots, utensils, and other equipment

On a cheesemaking day, I’ll start by sanitizing my equipment. Equipment I use includes a whisk; a long spoon; a large ladle for soft curd cheeses; a long, serrated bread knife for curd cutting; and a few measuring spoons and cups. Nothing you don’t already have. A more specialist piece of equipment is a (very) large colander for draining curds. For sanitizing, I use 1-Step No Rinse sanitizer. I just dunk every tool in some lukewarm water with 1-Step in it, then cover them lightly with a towel so they dry while I’m bringing the milk up to temp.

Cheesemaking equipment

Cheesemaking equipment

One critically important piece of cheesemaking equipment, that you really should spend the money on, is a quality thermometer. I use a Thermoworks Thermapen. Yes, it’s expensive. It’s recommended by lots of home cooks, including the incorruptible Alton Brown, and it obviously has lots of other uses around the kitchen than cheesemaking. Just get the Thermapen, you won’t regret it.

Some day I might buy a pH meter to take some guesswork out, but I haven’t needed it yet.

There are different techniques for bringing the milk up to inoculation temp. I don’t have the room to do a water bath, so I just heat it directly on the stove. I use a medium heat, stirring every five or so minutes. The important things are to avoid scalding, and avoid overshooting your target temperature. It took a few batches to find the ideal stove setting on my stovetop to avoid scalding without taking hours to heat up. At the setting I use, it takes 15-30 minutes to bring the milk up to temp.

Cheesemaking equipment

Cheesemaking equipment

I bought some cheesecloth off of Amazon back when I started, and I still have more than half of the roll left. You do want to make sure you get a fine grade cloth. Some stuff sold as “cheesecloth” has holes around 1/8″! This will pass much of your curd straight through and down the drain. The cloth I use is grade 60, called “very fine.” When I run out and buy again, I’ll probably try to find some “butter muslin,” which I think is even finer. Shop around and see what you can find. I do hand-wash and re-use my cheesecloths for several batches. Eventually it gets kinda chunky or discolored, and then I toss it and cut a new length.

For waxing, I found a pot at Goodwill to sacrifice to the wax. After using, I just let the wax cool in the pot (pictured) and put it away for storage. I tried to find tall, narrow pot as I wanted the wax to be deep so I could dip the wheel in without hitting the bottom of the pot.

Shaping forms (molds)

I call these “forms” because the word “mold” is overloaded in a cheesemaking context. You can buy expensive, perfect, thick plastic forms online for $$$. But I’m cheap, so I just use old plastic takeout containers. One thing that is important to me, is that everything that touches the cheese must be food-safe. Plastic containers that sold food are food-safe. Perfect.

DIY Cheesemaking Forms

DIY Cheesemaking Forms

What I do is find a plastic container about 4 inches in diameter and 4-6 inches tall. One was a container from Chinese takeout. Another held shredded meat from my local butcher shop. After eating the takeout/shredded meat, I give it a very good wash and grab my scissors and cut off the bottom just above where it curves. This is now my “follower,” which is used in the press on the top of the cheese. Because of the curve of the follower, I sometimes trim off the rim that forms after pressing to keep the top edge square.

Next I grab a long nail, about 1/8″ in diameter, and a blow torch (I use my girlfriend’s culinary torch, don’t tell her), and a pair of pliers. Heat up the nail with the torch and press it through the plastic to make drainage holes. I found it works best to push from the inside out, as this will leave the rough edge on the outside where the cheesecloth won’t get caught as much. Make a hole every 3/4″ or so, all around the form.

Now you have a perfectly good cheese form, for free! Compare that to the prices online…

Making Camembert

Making Camembert. The right sheetpan is ready to receive the flip.

Cheese press

You can buy a pre-fab cheese press online for $$$$$$. Or you can build your own out of a cutting board and some stuff from the hardware store for under $50. Again, every surface that touches the cheese should be food-safe. In this case, that just means the cutting board. I followed this guide by spike3579 on Instructables, but it’s pretty trivial. Cut a couple holes in your cutting board, use a long, threaded rod and some nuts. Grab some springs, cut some wall studs to length, and put it all together.

Sage Derby in the press

Sage Derby in the press

Some tricky parts to find were the springs and circular followers, which the hardware store didn’t have. I got lucky here. There’s a wacky local chain called Ax-Man Surplus that sells all sorts of crazy crap like misspelled pint glasses, random electrical items, mannequins, whatever. They happened to have some stiff-ish springs and some wooden circles for a few cents apiece. Bingo.

Cheese press parts diagram

Cheese press parts diagram

I use a half sheetpan to catch the whey drainage. The cheese press has rubber feet in the four corners to keep it out of the drained whey. Occasionally I’ll have to drain the whey into the sink.

Speaking of drainage, when I started making Camembert, which drains under its own weight, I needed some draining mats to allow the whey to flow off. I could have bought some mats online for five bucks apiece, but instead I went to a home goods store and bought a roll of flexible shelf liner, which I cut squares out of. Works a treat, and I got many yards for the price of a single drainage mat.

Fresh Camembert

Fresh Camembert

Cheese aging fridge

Once you’ve made your cheese, you’ll need someplace to age it. I got an unused wine fridge from my girlfriend’s parents. People are selling these for a dime-a-dozen on Craigslist. They work great because they’re cheap, small (cheap to cool), and have a thermostat built in. Mine only goes down to 50 degrees, which is a little warm for some cheeses, but it’s good enough.

To keep the humidity up, I use a sponge in a plastic container that I keep a little water in. This keeps it around 70-80%RH. For cheeses like Camembert that need 90+%RH, I use a tupperware with a loose lid and stick a wet paper towel in there. I bought a Thermoworks hygrometer/thermometer and leave it in the “aging cave” to monitor actual temp and humidity. I open the door as infrequently as possible to avoid fluctuations.

Conclusion

I hope you find this helpful in getting started and saving some money. If you’ve got some feedback or even your own ideas, please feel free to leave a comment below.

Posted in: Cheese

First Camembert results

Thu 26 February 2015 6:24 PM / Leave a Comment / Andrew

Here’s the results from my first Camembert. I cracked open one of the two wheels tonight. Aged just under three weeks.

2015_camembert_done_2

It turned out looking gorgeous. Dense, fine white fuzz that packed down to a smooth surface. A nice gentle grid pattern from the racks they aged on.

The cheese is very runny. Basically no solid center, just runny the whole way through. I think that’s because the wheels are so thin at about 1.5 cm in height. The mold was able to break down the milk solids all the way through in no time. I suspected from the start that I’d run into this problem. The inside of the cheese is basically pure white, it didn’t develop a yellow or cream color.

2015_camembert_done_1

The overriding flavor of the cheese is salt. I ate it on some bread, as shown, and it tasted mostly like salt on bread. But when I ate the cheese plain, the flavor really did come through. Still salty, but it had a bit of the creamy mushroom you expect from Camembert. A good, clean flavor, but very mild. The rind attached firmly to the innards and is moderately toothy.

I’m going to let my other wheel age at least another week, maybe two or three, before breaking into it. It’ll probably be super runny, but maybe it will develop some more flavor with the longer aging.

Lessons learned? With forms this size, maybe just do one wheel of Camembert from a one-gallon batch instead of two. I think this will give me the correct height, though the wheel will be pretty huge. Maybe tone down the salt, although I wonder if the extra saltiness comes from the small wheel size, too. I used the full amount of salt recommended by the recipe I used, and the small wheels may have thrown the ratio off.

Not a failure, but not as good as I was hoping. I’m interested to see what another couple weeks does for the flavor.

Posted in: Cheese

First forays into cheesemaking
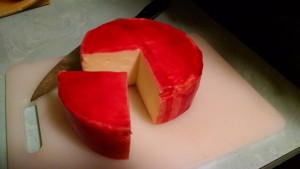
Tue 10 February 2015 4:44 PM / Leave a Comment / Andrew

Like most sane people, I’m a big fan of cheese. I also like to cook. I bake bread and brew beer, clearly I have an affinity for bacteria-based foodstuffs. Let’s try making cheese!

It’s actually turned out really good. I started last Fall. I built a simple cheese press, fasioned some forms out of old takeout containers, and ordered some rennet and bacteria online from cheesemaking.com. They’ve also been my primary source for recipes. I acquired a small wine fridge with a thermostat from a family member and bought a hygrometer from Thermoworks to put in it.

Below I’ve cataloged what cheeses I’ve made so far, and some thoughts I wrote about them at the time.

Five week Colby

Five week Colby

This was my second aged cheese, after a 2-month simple “farmers cheese.” I don’t have any photographs of that one, so we’ll start here. This Colby turned out really fantastic. It had a bit of tang to it, but mostly it was creamy. The recipe has you washing the curds in cold water, which should retain some of the moisture after cooking.

Sage Derby in the press

Sage Derby in the press

Next came the Sage Derby. This was the first batch that was cheddared. You can see it in the cheese press here.

Four week Derby Sage

Four week Derby Sage

Four weeks later, it turned out pretty good. Very sage-y! It worked best on sandwiches or crackers, because it was very overwhelming by itself. A little dry because I overcooked the curds.

I still need to work on my waxing technique. You can see in the photo that the wax is quite thin. Some whey leaked out of the cheese while it was aging in the fridge.

Five week Cheshire

Five week Cheshire

Finally is the Cheshire, opened just a few days ago. This is my favorite so far. It’s dry, salty, crumbly, and creamy. It’s got a good pungent kick to it that my other cheeses haven’t had. I feel it’s the first one that’s had its own flavor instead of mostly tasting like “cheese.” The recipe has the curds sitting at a high temperature overnight before pressing. That lets the bacteria work full-bore on the curds for 8 hours, so that’s probably where the flavor comes from. This is the first cheese that’s so good, I want to make the same recipe again instead of trying something new.

Again, I had wax problems with some mold developing on the surface in the pockets. I washed it in brine and cut off the wax to avoid the mold, but luckily none of it penetrated into the cheese.

I’ve also got two cheeses aging. One is a plain Gouda, which will be opened in mid-March at just over three months of aging, by far my longest aged cheese. The other is two wheels of Camembert, my first aged soft cheese. I’m real nervous about this one. I’m currently on day three, letting the wheels dry out in a quiet, spare room. So far no mold, good or bad, but the surface is still quite wet. I’m eager for it to dry out so I can move it to the aging fridge. The house is pretty cold, though, so I’m not too worried about it ripening too early.

Fresh Camembert

Fresh Camembert

Posted in: Cheese

About

Occasional posts about cars, woodworking, Linux, cooking, the Internet, or whatever I find interesting.

Recent Posts

  • My problem with Game of the Year lists
  • New year, new project: Cherry dining table
  • Project completed: The Cat Tower
  • Good buys from my first MWTCA tool meeting
  • Woodworking podcasts, blogs, videos, magazines and books

Archives

  • January 2019
  • June 2018
  • February 2018
  • May 2017
  • January 2017
  • September 2015
  • March 2015
  • February 2015
  • November 2013
  • March 2013
  • December 2012
  • October 2012

Categories

  • Cars
  • Cheese
  • Gaming
  • Uncategorized
  • Woodworking
© Copyright 2014-2018 Andrew Eikum | Privacy Statement
Infinity Theme by DesignCoral / WordPress